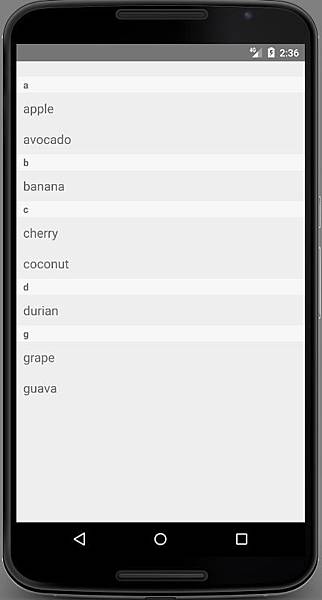
React Native提供一套用於顯示數據列表工具,可用方法有FlatList與SectionList,這裡介紹SectionList,SectionList可以將各個資料做分類顯示,主要用到分類標題顯示renderSectionHeader與資料顯示renderItem,程式寫法如下:
<SectionList
sections={[
{title: 分類標題顯示, data: [{key: 資料顯示}, {key: 資料顯示}]},
...
]}
renderItem={({item}) => <Text>{item.key}</Text>}
renderSectionHeader={({section}) => <Text>{section.title}</Text>}
/>
首先介紹SectionList為這次標籤,如下所示,

主程式部份,在View中的增加<SectionList>數據列表工具,在sections先新增要顯示標題與資料,再使用renderSectionHeader與renderItem來顯示,如下所示,

接下來是Style程式,

接下來修改在[筆記]安裝React-Native與創造第一個專案,所創造的專案來演示此功能,
import {
AppRegistry,
StyleSheet,
SectionList,
View,
Text
} from 'react-native';
export default class AwesomeProject extends Component {
render() {
return (
<View style={styles.container}>
<SectionList
sections={[
{title: 'a', data: [{key:'apple'}, {key:'avocado'}]},
{title: 'b', data: [{key:'banana'}]},
{title: 'c', data: [{key:'cherry'}, {key:'coconut'}]},
{title: 'd', data: [{key:'durian'}]},
{title: 'g', data: [{key:'grape'}, {key:'guava'}]},
]}
renderItem={({item}) => <Text style={styles.textSytle}>{item.key}</Text>}
renderSectionHeader={({section}) => <Text style={styles.sectionSytle}>{section.title}</Text>}
/>
</View>
);
}
}
const styles = StyleSheet.create({
container: {
flex: 1,
paddingTop: 22
},
textSytle: {
padding: 10,
fontSize: 18,
height: 44,
},
sectionSytle: {
paddingTop: 2,
paddingLeft: 10,
paddingRight: 10,
paddingBottom: 2,
fontSize: 14,
fontWeight: 'bold',
backgroundColor: 'rgba(247,247,247,1.0)',
}
});
在Node.js command prompt執行"react-native run-android",即可安裝在模擬器或手機上演示,


 留言列表
留言列表
